Название: Greating 3D-Graphics on visual basic
Вид работы: лабораторная работа
Рубрика: Информатика и программирование
Размер файла: 173.88 Kb
Скачать файл: referat.me-133894.docx
Краткое описание работы: Program automatic system on visual basic for graiting 3D-Graphics. Text of source code for program functions. Setting the angle and draw the rotation. There are functions for choose the color, finds the normal of each plane, draw lines and other.
Greating 3D-Graphics on visual basic
AUTOMATIC SYSTEM
CREATING 3D-GRAPHICS ON VISUAL BASIC
Dushanbe, 2009
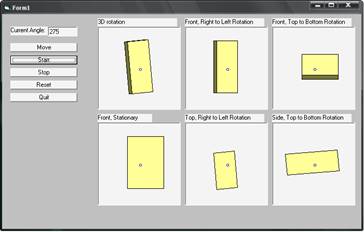
INTERFACE

SOURCE CODE
Dim Angle As Double 'The rotation angle
Dim AngleHolder As Double 'holder for previous rotation angle
Dim NumObjectSides As Integer 'Number of sides making up the object
Private Type Point 'The makeup of a point
X As Double 'the X location of the point
Y As Double 'the Y location of the point
Z As Double 'the Z location of the point
End Type
Dim Center As Point 'center of the picboxes
Private Type Verticies 'The verticies of a side
NumPoints As Integer 'The number of points on a line
Points (20) As Point 'the actual endpoints of each line
Normal As Point 'The normal of the Plane
End Type
Dim Sides (50) As Verticies 'the sides of the object
Dim XSides (50) As Verticies 'the X rotation points
Dim YSides (50) As Verticies 'the Y rotation points
Dim ZSides (50) As Verticies 'the Z rotation points
Dim Sides3D (50) As Verticies 'the 3D rotation of points
Dim CosAng (359) As Double 'A lookup table to hold the Cosine Angles
Dim SinAng (359) As Double 'A lookup table to hold the Sine Angles
Private Type POINTAPI 'This is the drawn Points of the
X As Long 'object to fill it and draw it fast
Y As Long 'using a win api function
End Type
Dim tmp () As POINTAPI
'This function is for drawing filled polygons Much faster than anything I wrote
Private Declare Function Polygon Lib "gdi32" _
(ByVal hdc As Long, lpPoint As POINTAPI, ByVal nCount As Long) As Long
Private Sub BUTNOKAY_Click ()
'set the angle and draw the rotation
AngleHolder = AngleHolder + 5 'increment the angle
If AngleHolder = 360 Then 'reset the angle back to 0
AngleHolder = 0
End If
TEXTAngle. Text = AngleHolder 'display the current angle
Angle = AngleHolder 'Set the angle for calculations
Redraw 'refresh the display
End Sub
Private Sub BUTNQuit_Click ()
End 'end the program
End Sub
Private Sub BUTNReset_Click ()
AngleHolder = 355 'reset so displayed angle will be 0
BUTNOKAY_Click 'set angles and displays, then redraw
End Sub
Private Sub BUTNStart_Click ()
Timer1. Enabled = True 'start the autodraw timer
End Sub
Private Sub BUTNStop_Click ()
Timer1. Enabled = False 'stop the auto draw timer
End Sub
Private Sub Form_Load ()
'Form1. ScaleMode = vbTwips
Angle = 0 'initialize the angles
AngleHolder = 355
Center. X = Pic3D. Width / 2 'set the centers (all coordinates for the picboxes must be equal
Center. Y = Pic3D. Height / 2 'acroos picboxes for this to work) (i. e. the X dimension in left
Center. Z = Pic3D. Width / 2 'to right picbox must equal X dimension in top to bottom picbox)
'set points for rectangle (could be done in a better way loop etc)
'Also shape does not have to be rectangle can be any shape
'front
Sides (0). Points (0). X = - 20: Sides (0). Points (0). Y = - 50: Sides (0). Points (0). Z = 20
Sides (0). Points (1). X = 50: Sides (0). Points (1). Y = - 50: Sides (0). Points (1). Z = 20
Sides (0). Points (2). X = 50: Sides (0). Points (2). Y = 50: Sides (0). Points (2). Z = 20
Sides (0). Points (3). X = - 20: Sides (0). Points (3). Y = 50: Sides (0). Points (3). Z = 20
'back
Sides (1). Points (0). X = 50: Sides (1). Points (0). Y = - 50: Sides (1). Points (0). Z = - 20
Sides (1). Points (1). X = - 20: Sides (1). Points (1). Y = - 50: Sides (1). Points (1). Z = - 20
Sides (1). Points (2). X = - 20: Sides (1). Points (2). Y = 50: Sides (1). Points (2). Z = - 20
Sides (1). Points (3). X = 50: Sides (1). Points (3). Y = 50: Sides (1). Points (3). Z = - 20
'Top
Sides (2). Points (0). X = - 20: Sides (2). Points (0). Y = - 50: Sides (2). Points (0). Z = - 20
Sides (2). Points (1). X = 50: Sides (2). Points (1). Y = - 50: Sides (2). Points (1). Z = - 20
Sides (2). Points (2). X = 50: Sides (2). Points (2). Y = - 50: Sides (2). Points (2). Z = 20
Sides (2). Points (3). X = - 20: Sides (2). Points (3). Y = - 50: Sides (2). Points (3). Z = 20
'bottom
Sides (3). Points (0). X = - 20: Sides (3). Points (0). Y = 50: Sides (3). Points (0). Z = 20
Sides (3). Points (1). X = 50: Sides (3). Points (1). Y = 50: Sides (3). Points (1). Z = 20
Sides (3). Points (2). X = 50: Sides (3). Points (2). Y = 50: Sides (3). Points (2). Z = - 20
Sides (3). Points (3). X = - 20: Sides (3). Points (3). Y = 50: Sides (3). Points (3). Z = - 20
'Lside
Sides (4). Points (0). X = - 20: Sides (4). Points (0). Y = - 50: Sides (4). Points (0). Z = - 20
Sides (4). Points (1). X = - 20: Sides (4). Points (1). Y = - 50: Sides (4). Points (1). Z = 20
Sides (4). Points (2). X = - 20: Sides (4). Points (2). Y = 50: Sides (4). Points (2). Z = 20
Sides (4). Points (3). X = - 20: Sides (4). Points (3). Y = 50: Sides (4). Points (3). Z = - 20
'Rside
Sides (5). Points (0). X = 50: Sides (5). Points (0). Y = - 50: Sides (5). Points (0). Z = 20
Sides (5). Points (1). X = 50: Sides (5). Points (1). Y = - 50: Sides (5). Points (1). Z = - 20
Sides (5). Points (2). X = 50: Sides (5). Points (2). Y = 50: Sides (5). Points (2). Z = - 20
Sides (5). Points (3). X = 50: Sides (5). Points (3). Y = 50: Sides (5). Points (3). Z = 20
'set the number of edges for each side
For i = 0 To 5
Sides (i). NumPoints = 3
Next i
'set the number of sides the object has
NumObjectSides = 5
'Calculate the Normals
FindNormals
'Create the Lookup table for the Cos and Sin functions.
'This method is much faster than calculating each step
CreateTables
'set angles and displays, then redraw
BUTNOKAY_Click
End Sub
Sub Redraw ()
'clear the picboxes
PicXY. Cls
PicFRL. Cls
PicTop. Cls
PicFTB. Cls
PicSTB. Cls
Pic3D. Cls
'draw the front of the box in the stationary view
DrawShape Sides (0), PicXY, "FRONT"
'repeat loop 6 times once for each side the rotation of each point must
'be calculated to find the new position of the normal of each side to
'determine if it's visible
For j = 0 To 5
'*********************************************************
'draw the points for a top to bottom rotation (rotation around
'the X axis)
'*********************************************************
For i = 0 To Sides (0). NumPoints
XSides (j). NumPoints = Sides (0). NumPoints
XSides (j). Points (i). X = Sides (j). Points (i). X 'new x value
XSides (j). Points (i). Y = Sides (j). Points (i). Y * CosAng (Angle) - Sides (j). Points (i). Z * SinAng (Angle) 'new y value
XSides (j). Points (i). Z = Sides (j). Points (i). Z * CosAng (Angle) + Sides (j). Points (i). Y * SinAng (Angle) 'new z value
XSides (j). Normal. X = Sides (j). Normal. X
XSides (j). Normal. Y = Sides (j). Normal. Y * CosAng (Angle) - Sides (j). Normal. Z * SinAng (Angle) 'new y value
XSides (j). Normal. Z = Sides (j). Normal. Z * CosAng (Angle) + Sides (j). Normal. Y * SinAng (Angle) 'new z value
Next i
'check to see if plane is visible if so draw it
If VisiblePlane (XSides (j), 0, 0, 1000) Then
'Draw lines in top, top to bottom rotation
DrawShape XSides (j), PicFTB, "FRONT"
End If
If VisiblePlane (XSides (j), 1000, 0, 0) Then
'Draw points in side, top to bottom rotation view
DrawShape XSides (j), PicSTB, "SIDE"
End If
'*********************************************************
'draw the points for a left to right rotation (rotation around
'the Y axis)
'**********************************************************
For i = 0 To Sides (0). NumPoints
YSides (j). NumPoints = Sides (0). NumPoints
YSides (j). Points (i). X = Sides (j). Points (i). X * CosAng (Angle) + Sides (j). Points (i). Z * SinAng (Angle) 'new x value
YSides (j). Points (i). Y = Sides (j). Points (i). Y 'new y value
YSides (j). Points (i). Z = Sides (j). Points (i). Z * CosAng (Angle) - Sides (j). Points (i). X * SinAng (Angle) 'new z value
YSides (j). Normal. X = Sides (j). Normal. X * CosAng (Angle) + Sides (j). Normal. Z * SinAng (Angle) 'new x value
YSides (j). Normal. Y = Sides (j). Normal. Y 'new y value
YSides (j). Normal. Z = Sides (j). Normal. Z * CosAng (Angle) - Sides (j). Normal. X * SinAng (Angle) 'new z value
Next i
'check to see if plane is visible if so draw it
If VisiblePlane (YSides (j), 0, 0, 1000) Then
'Draw lines in front right to left rotation view
DrawShape YSides (j), PicFRL, "FRONT"
End If
If VisiblePlane (YSides (j), 0, 1000, 0) Then
'Draw lines in top right to left rotation view
DrawShape YSides (j), PicTop, "TOP"
End If
'**********************************************************
'draw the points for a sideways rotation (rotation around
'the Z axis)
'**********************************************************
'Remove comments to do calculation
'Rotate Z direction
'For i = 0 To Sides (0). NumPoints
' ZSides (j). NumPoints = Sides (0). NumPoints
' ZSides (j). Points (i). X = Sides (j). Points (i). X * CosAng (Angle) + Sides (j). Points (i). Y * SinAng (Angle) 'new x value
' ZSides (j). Points (i). Y = Sides (j). Points (i). Y * CosAng (Angle) - Sides (j). Points (i). X * SinAng (Angle) 'new y value
' ZSides (j). Points (i). Z = Sides (j). Points (i). Z 'new z value
' ZSides (j). Normal. X = Sides (j). Normal. X * CosAng (Angle) + Sides (j). Normal. Y * SinAng (Angle) 'new x value
' ZSides (j). Normal. Y = Sides (j). Normal. Y * CosAng (Angle) - Sides (j). Normal. X * SinAng (Angle) 'new y value
' ZSides (j). Normal. Z = Sides (j). Normal. Z 'new z value
'Next i
'Rotate values rotated in X direction in Z direction to make "spinning effect"
For i = 0 To Sides (0). NumPoints
Sides3D (j). NumPoints = Sides (0). NumPoints
Sides3D (j). Points (i). X = XSides (j). Points (i). X * CosAng (Angle) + XSides (j). Points (i). Y * SinAng (Angle) 'new x value
Sides3D (j). Points (i). Y = XSides (j). Points (i). Y * CosAng (Angle) - XSides (j). Points (i). X * SinAng (Angle) 'new y value
Sides3D (j). Points (i). Z = XSides (j). Points (i). Z 'new z value
Sides3D (j). Normal. X = XSides (j). Normal. X * CosAng (Angle) + XSides (j). Normal. Y * SinAng (Angle) 'new x value
Sides3D (j). Normal. Y = XSides (j). Normal. Y * CosAng (Angle) - XSides (j). Normal. X * SinAng (Angle) 'new y value
Sides3D (j). Normal. Z = XSides (j). Normal. Z 'new z value
Next i
'check to see if plane is visible if so draw it
If VisiblePlane (Sides3D (j), 0, 1000, 0) Then
'Draw the 2 direction rotation
DrawShape Sides3D (j), Pic3D, "TOP"
End If
Next j
'draw centerpoint of each picbox in Blue
PicXY. Circle (Center. X, Center. Y), 30, RGB (0, 0, 255)
PicFRL. Circle (Center. X, Center. Y), 30, RGB (0, 0, 255)
PicTop. Circle (Center. X, Center. Y), 30, RGB (0, 0, 255)
PicFTB. Circle (Center. X, Center. Y), 30, RGB (0, 0, 255)
PicSTB. Circle (Center. X, Center. Y), 30, RGB (0, 0, 255)
Pic3D. Circle (Center. X, Center. Y), 30, RGB (0, 0, 255)
End Sub
Private Sub Timer1_Timer ()
'rotate the rectangle
BUTNOKAY_Click
End Sub
Private Function DrawShape (shape As Verticies, PicBox As PictureBox, View As String)
' add 75 to all points to center object
'determine view
If View = "FRONT" Then
'create lppoints for the win func call
ReDim tmp (shape. NumPoints) As POINTAPI
'fill in the drawing points tmp. x as the value going in the x dir etc
For i = 0 To shape. NumPoints
tmp (i). X = shape. Points (i). X + 75
tmp (i). Y = shape. Points (i). Y + 75
Next i
'Draw solid polygons
'calculate light value (ambient + Max * (normal of plane * light position)
Colr = 100 + 200 * (shape. Normal. Z)
'Fill object as solid
PicBox. FillStyle = 0
'Choose the color (this way makes a shade of yellow)
PicBox. FillColor = RGB (Colr, Colr, Colr / 2)
'draw the polygon
Polygon PicBox. hdc, tmp (0), shape. NumPoints + 1
'draw rest of objects transparently
PicBox. FillStyle = 1
ElseIf View = "TOP" Then
'creat lppoints for the win func call
ReDim tmp (shape. NumPoints) As POINTAPI
'fill in the drawing points tmp. x as the value going in the x dir etc
For i = 0 To shape. NumPoints
tmp (i). X = shape. Points (i). X + 75
tmp (i). Y = shape. Points (i). Z + 75
Next i
'Draw solid polygons
'calculate light value (ambient + Max * (normal of plane * light position)
Colr = 100 + 200 * (shape. Normal. Y)
'Fill object as solid
PicBox. FillStyle = 0
'Choose the color (this way makes a shade of yellow)
PicBox. FillColor = RGB (Colr, Colr, Colr / 2)
'draw the polygon
Polygon PicBox. hdc, tmp (0), shape. NumPoints + 1
'draw rest of objects transparently
PicBox. FillStyle = 1
ElseIf View = "SIDE" Then
'creat lppoints for the win func call
ReDim tmp (shape. NumPoints) As POINTAPI
'fill in the drawing points tmp. x as the value going in the x dir etc
For i = 0 To shape. NumPoints
tmp (i). X = shape. Points (i). Z + 75
tmp (i). Y = shape. Points (i). Y + 75
Next i
'Draw solid polygons
'calculate color value (ambient + Max * (normal of plane * light position)
Colr = 100 + 200 * (shape. Normal. X)
'Fill object as solid
PicBox. FillStyle = 0
'Choose the color (this way makes a shade of yellow)
PicBox. FillColor = RGB (Colr, Colr, Colr / 2)
'draw the polygon
Polygon PicBox. hdc, tmp (0), shape. NumPoints + 1
'draw rest of objects transparently
PicBox. FillStyle = 1
End If
End Function
Private Function VisiblePlane (shape As Verticies, CameraX As Integer, CameraY As Integer, CameraZ As Integer)
'this function takes the normal of the plane and returns True if visible FALSE if
'not visible
'Camera is the spot the object is being viewed from
'Find the dot product
D = (shape. Normal. X * CameraX) + (shape. Normal. Y * CameraY) + (shape. Normal. Z * CameraZ)
'return true if object is visible
VisiblePlane = D >= 0
End Function
Private Function FindNormals ()
'This function finds the normal of each plane
For i = 0 To NumObjectSides
'Find the normal vector
With Sides (i)
' * * * * * * * *
Nx = (. Points (1). Y - Points (0). Y) * (. Points (. NumPoints). Z - Points (0). Z) - (. Points (1). Z - Points (0). Z) * (. Points (. NumPoints). Y - Points (0). Y)
Ny = (. Points (1). Z - Points (0). Z) * (. Points (. NumPoints). X - Points (0). X) - (. Points (1). X - Points (0). X) * (. Points (. NumPoints). Z - Points (0). Z)
Nz = (. Points (1). X - Points (0). X) * (. Points (. NumPoints). Y - Points (0). Y) - (. Points (1). Y - Points (0). Y) * (. Points (. NumPoints). X - Points (0). X)
'Normalize the normal vector (make length of 1)
Length = Sqr (Nx ^ 2 + Ny ^ 2 + Nz ^ 2)
. Normal. X = Nx / Length
. Normal. Y = Ny / Length
. Normal. Z = Nz / Length
End With
Next i
End Function
Private Function CreateTables ()
'Create cosine and sine lookup table
For i = 0 To 359
CosAng (i) = Cos (i * (3.14159265358979/180)) 'convert degrees to radians
SinAng (i) = Sin (i * (3.14159265358979/180)) 'convert degrees to radians
Next i
End Function
Main Interface

Похожие работы
-
Вычисление значения функции y(x)
Особенности применения компьютерных программ Pascal, Excel, MathCAD и Delphi для вычисления значения функции y(x) с заданным промежутком и шагом. Виды результатов вычислений, их сравнение и вывод. Изображение блок-схемы алгоритма решения задания.
-
Visual Basic и Системный Реестр Windows
Системный Реестр (Registry) Windows это база данных для хранения системной и пользовательской информации в Windows. Системный Реестр состоит из двух файлов.
-
Вращение треугольника
Содержание Введение 2 В программу также были включены функции предоставляющие пользователю некоторый сервис и удобство при работе ( использование модулей Turbo-Vision 2.0 for Borland Pascal). 5
-
Baldur's Gate
The world of role-playing games was born when J.R.Tolkien issued his marvelous novel “Fellowship of the Ring”. This novel has changed the world of teenagers. Many role-playing clubs all over the world opened their doors to countless Tolkien admirers. In parallel, the industry of computer games has been conquering the world of entertainment, and it’s not a surprise that these two branches have merged into one priceless gift to the world – computer role-playing games.
-
Audio recorder on visual basic
Program of Audio recorder on visual basic. Text of source code for program functions. This code can be used as freeware. View of interface in action, starting position for play and recording files. Setting format in milliseconds and finding position.
-
Работа с графическим пакетом Corel Draw и создание тестовой программы в среде Visual Basic
Система программирования - Visual Basic. Новые возможности. Быстрый запуск проекта. Средства управления. Что позволяет Visual Basic. Краткое описание работы. Corel Draw. Отличие векторной графики от растровой. Краткое описание работы в Corel Draw.
-
Управление элементами поверхности
Изучение основных возможностей создания трехмерных объектов в программе OpenGL, методика наложения текстур. Механизм подключения библиотек. Создание поверхности ландшафта. Реализация ориентирования на поверхности. Изменение поверхности ландшафта.
-
Greating game on visual basic with multiplayer system
Program game "Tic-tac-toe" with multiplayer system on visual basic. Text of source code for program functions. View of main interface. There are functions for entering a Players name and Game Name, keep local copy of player, graiting message in chat.
-
Division of the sentence into phrases
Lists used by Algorithm No 2. Some examples of the performance of Algorithm No 2. Invention of the program of reading, development of efficient algorithm of the program. Application of the programs to any English texts. The actual users of the algorithm.
-
Creating graphic editor
Creation of the graphic program with Visual Basic and its common interface. The text of program code in programming of Visual Basic language creating in graphics editor. Creation of pictures in Visual Basic, some graphic actions with graphic editor.