Название: Creating graphic editor
Вид работы: лабораторная работа
Рубрика: Информатика и программирование
Размер файла: 416.02 Kb
Скачать файл: referat.me-133880.docx
Краткое описание работы: Creation of the graphic program with Visual Basic and its common interface. The text of program code in programming of Visual Basic language creating in graphics editor. Creation of pictures in Visual Basic, some graphic actions with graphic editor.
Creating graphic editor
CREATING GRAPHIC EDITOR
On Visual Basic
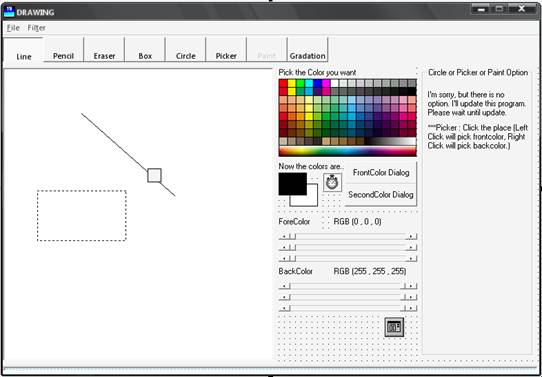
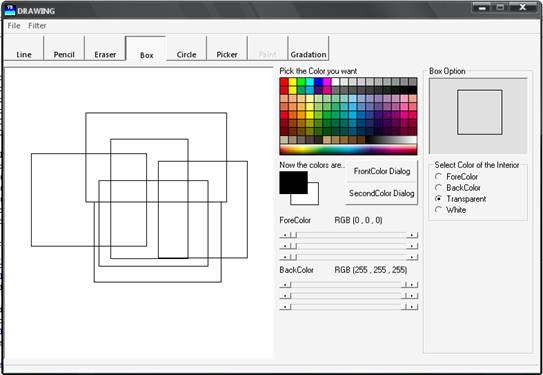
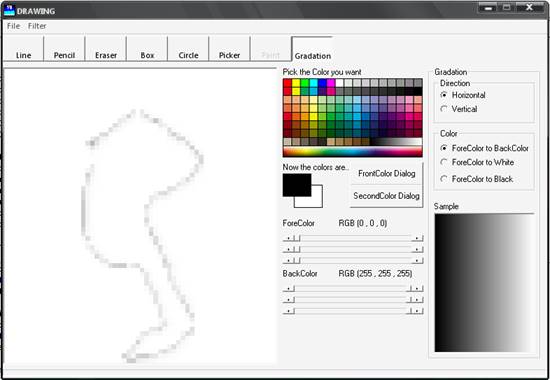
Main INTERFACE
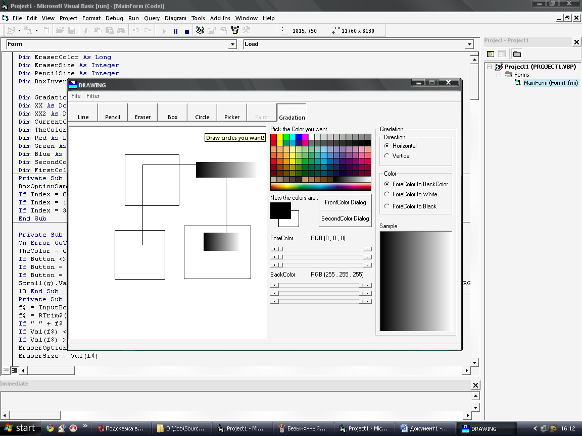
Source Code:
Dim EraserColor As Long
Dim EraserSize As Integer
Dim PencilSize As Integer
Dim BoxInversed As Boolean
Dim GradationChanged As Boolean
Dim XX As Double, YY As Double
Dim XX2 As Double, YY2 As Double
Dim CurrentChoice
Dim TheColor As Long
Dim Red As Long
Dim Green As Long
Dim Blue As Long
Dim SecondColor As Long
Dim FirstColor As Long
Private Sub BoxOptionInterior_Click (Index As Integer)
BoxOptionSample. BackStyle = IIf (Index = 2, 0, 1)
If Index = 0 Then BoxOptionSample. BackColor = FirstColor
If Index = 1 Then BoxOptionSample. BackColor = SecondColor
If Index = 3 Then BoxOptionSample. BackColor = &HFFFFFF
End Sub
Private Sub ColorBoard_MouseMove (Button As Integer, Shift As Integer, x As Single, y As Single)
On Error GoTo 10
TheColor = ColorBoard. Point (x, y)
If Button <> 1 And Button <> 2 Then Exit Sub
If Button = 1 Then ForeColorSample. BackColor = TheColor: FirstColor = TheColor: g = 0
If Button = 2 Then BackColorSample. BackColor = TheColor: SecondColor = TheColor: g = 3
Scroll(g).Value = TakeRGB (TheColor, 0): Scroll (g + 1).Value = TakeRGB (TheColor, 1): Scroll (g + 2).Value = TakeRGB (TheColor, 2)
10 End Sub
Private Sub Command1_Click()
f$ = InputBox («Input the size of the eraser», «Drawer V1.0», EraserOptionText. Text)
f$ = RTrim$(LTrim$(f$))
If «» + f$ <> Str$(Val (f$)) Then MsgBox «Input error!», vbOKOnly, «Drawer V1.0»: Exit Sub
If Val (f$) <> Int (Val(f$)) Then MsgBox «Input error!», vbOKOnly, «Drawer V1.0»: Exit Sub
If Val (f$) > 500 Or Val (f$) < 100 Then MsgBox «Input error!», vbOKOnly, «Drawer V1.0»: Exit Sub
EraserOptionText. Text = f$
EraserSize = Val (f$)
Shape3. Width = Val (f$): Shape3. Height = Val (f$)
Shape1. Width = Val (f$): Shape1. Height = Val (f$)
End Sub
Private Sub Command2_Click()
f$ = InputBox («Input the border of the line or pencil», «Drawer V1.0», LineOptionText. Text)
f$ = RTrim$(LTrim$(f$))
If «» + f$ <> Str$(Val (f$)) Then MsgBox «Input error!», vbOKOnly, «Drawer V1.0»: Exit Sub
If Val (f$) <> Int (Val(f$)) Then MsgBox «Input error!», vbOKOnly, «Drawer V1.0»: Exit Sub
If Val (f$) > 10 Or Val (f$) < 1 Then MsgBox «Input error!», vbOKOnly, «Drawer V1.0»: Exit Sub
LineOptionText. Text = f$
PencilSize = Val (f$)
Line2. BorderWidth = Val (f$)
End Sub
Private Sub DialogBox_Click (Index As Integer)
Static coloring As Long
On Error GoTo 100
CommonDialog1. ShowColor
coloring = CommonDialog1. Color
Scroll (Index * 3).Value = TakeRGB (coloring, 0)
Scroll (Index * 3 + 1).Value = TakeRGB (coloring, 1)
Scroll (Index * 3 + 2).Value = TakeRGB (coloring, 2)
100
End Sub
Private Sub EraserOptionColor_Click (Index As Integer)
EraserColor = IIf (Index = 0, SecondColor, &HFFFFFF)
End Sub
Private Sub EraserOptionText_GotFocus()
Command1. SetFocus
End Sub
Private Sub Form_Load()
EraserColor = &HFFFFFF
PencilSize = 1
EraserSize = 300
CurrentChoice = 1
FirstColor = &H0
SecondColor = &HFFFFFF
End Sub
Private Sub Form_MouseMove (Button As Integer, Shift As Integer, x As Single, y As Single)
Shape1. Visible = False
End Sub
Private Sub GradationColor_Click (Index As Integer)
GradationChanged = True
End Sub
Private Sub GradationDirection_Click (Index As Integer)
GradationChanged = True
End Sub
Private Sub LineOptionText_GotFocus()
Command2. SetFocus
End Sub
Private Sub MainPic_MouseDown (Button As Integer, Shift As Integer, x As Single, y As Single)
If Button <> 1 Then Exit Sub
Select Case CurrentChoice
Case 1
Line1.X1 = x: Line1.X2 = x
Line1.Y1 = y: Line1.Y2 = y
Line1. Visible = True
Case 2
XX = x: YY = y
Case 3
MainPic. Line (Shape1. Left, Shape1. Top) – (Shape1. Left + Shape1. Width, Shape1. Top + Shape1. Width), EraserColor, BF
Case 4, 5, 8
XX = x: YY = y
XX2 = x: YY2 = y
Shape2. Shape = IIf (CurrentChoice = 5, 2, 0)
Shape2. Visible = True
Shape2. Left = x: Shape2. Top = y
Shape2. Width = 0: Shape2. Height = 0
End Select
End Sub
Private Sub MainPic_MouseMove (Button As Integer, Shift As Integer, x As Single, y As Single)
If CurrentChoice = 3 Then
Shape1. Left = x – Shape1. Width / 2
Shape1. Top = y – Shape1. Width / 2
Shape1. Visible = True
End If
If Button <> 1 Then GoTo 10
Select Case CurrentChoice
Case 1
Line1.X2 = x: Line1.Y2 = y
Case 2
MainPic. DrawWidth = PencilSize
MainPic. Line (XX, YY) – (x, y), FirstColor: XX = x: YY = y
MainPic. DrawWidth = 1
Case 3
MainPic. Line (Shape1. Left, Shape1. Top) – (Shape1. Left + Shape1. Width, Shape1. Top + Shape1. Width), EraserColor, BF
Case 4, 5, 8
XX2 = x: YY2 = y
Shape2. Left = IIf (x > XX, XX, x)
Shape2. Top = IIf (y > YY, YY, y)
Shape2. Width = Abs (x – XX)
Shape2. Height = Abs (y – YY)
Case 6
Scroll(0).Value = TakeRGB (MainPic. Point (x, y), 0)
Scroll(1).Value = TakeRGB (MainPic. Point (x, y), 1)
Scroll(2).Value = TakeRGB (MainPic. Point (x, y), 2)
End Select
Exit Sub
10 If Button <> 2 Or CurrentChoice <> 6 Then Exit Sub
Scroll(3).Value = TakeRGB (MainPic. Point (x, y), 0)
Scroll(4).Value = TakeRGB (MainPic. Point (x, y), 1)
Scroll(5).Value = TakeRGB (MainPic. Point (x, y), 2)
End Sub
Private Sub MainPic_MouseUp (Button As Integer, Shift As Integer, x As Single, y As Single)
If Button <> 1 Then Exit Sub
Select Case CurrentChoice
Case 1
MainPic. DrawWidth = PencilSize
MainPic. Line (Line1.X1, Line1.Y1) – (Line1.X2, Line1.Y2), FirstColor
MainPic. DrawWidth = 1
Line1. Visible = False
Case 4
If BoxOptionInterior(0).Value = True Then MainPic. Line (XX, YY) – (XX2, YY2), FirstColor, BF
If BoxOptionInterior(1).Value = True Then MainPic. Line (XX, YY) – (XX2, YY2), SecondColor, BF
If BoxOptionInterior(3).Value = True Then MainPic. Line (XX, YY) – (XX2, YY2), &HFFFFFF, BF
MainPic. Line (XX, YY) – (XX2, YY2), FirstColor, B
Shape2. Visible = False
Case 5
Rad = IIf (Abs(YY2 – YY) > Abs (XX2 – XX), Abs (YY2 – YY) / 2, Abs (XX2 – XX) / 2)
If XX2 <> XX Then MainPic. Circle ((XX2 + XX) / 2, (YY2 + YY) / 2), Rad, FirstColor, Abs (YY2 – YY) / Abs (XX2 – XX)
Shape2. Visible = False
Case 8
Dim sc1 As Long
Dim sc2 As Long
sc1 = FirstColor
If GradationColor(0).Value = True Then sc2 = SecondColor
If GradationColor(1).Value = True Then sc2 = &HFFFFFF
If GradationColor(2).Value = True Then sc2 = &H0
f1 = TakeRGB (sc2, 0): f2 = TakeRGB (sc2, 1): f3 = TakeRGB (sc2, 2)
v1 = TakeRGB (sc1, 0): v2 = TakeRGB (sc1, 1): v3 = TakeRGB (sc1, 2)
forstep = 10
If XX2 < XX Then xx3 = XX: XX = XX2: XX2 = xx3
If YY2 < YY Then yy3 = YY: YY = YY2: YY2 = yy3
ForStart = IIf (GradationDirection(0).Value = True, XX, YY)
Endpro = IIf (GradationDirection(0).Value = True, XX2, YY2)
For i = ForStart To Endpro Step forstep
D1 = v1 + (f1 – v1) / (Endpro – ForStart) * (i – ForStart)
D2 = v2 + (f2 – v2) / (Endpro – ForStart) * (i – ForStart)
D3 = v3 + (f3 – v3) / (Endpro – ForStart) * (i – ForStart)
If GradationDirection(0).Value = True Then MainPic. Line (i, YY) – (i, YY2), RGB (D1, D2, D3)
If GradationDirection(1).Value = True Then MainPic. Line (XX, i) – (XX2, i), RGB (D1, D2, D3)
Next i
Shape2. Visible = False
End Select
End Sub
Private Sub Scroll_Change (Index As Integer)
P = Int (Index / 3)
RGBValue(P).Caption = «RGB (» + RTrim$(Str$(Scroll (P * 3).Value)) +»,» + RTrim$(Str$(Scroll (P * 3 + 1).Value)) +»,» + RTrim$(Str$(Scroll (P * 3 + 2).Value)) +»)»
TheColor = RGB (Scroll(P * 3).Value, Scroll (P * 3 + 1).Value, Scroll (P * 3 + 2).Value)
If P = 0 Then FirstColor = TheColor: ForeColorSample. BackColor = TheColor Else SecondColor = TheColor: BackColorSample. BackColor = TheColor
Line2. BorderColor = FirstColor
BoxOptionSample. BorderColor = FirstColor
If BoxOptionInterior(0).Value = True Then BoxOptionSample. BackColor = FirstColor
If BoxOptionInterior(1).Value = True Then BoxOptionSample. BackColor = SecondColor
GradationChanged = True
End Sub
Private Sub Scroll_Scroll (Index As Integer)
P = Int (Index / 3)
RGBValue(P).Caption = «RGB (» + RTrim$(Str$(Scroll (P * 3).Value)) +»,» + RTrim$(Str$(Scroll (P * 3 + 1).Value)) +»,» + RTrim$(Str$(Scroll (P * 3 + 2).Value)) +»)»
TheColor = RGB (Scroll(P * 3).Value, Scroll (P * 3 + 1).Value, Scroll (P * 3 + 2).Value)
If P = 0 Then FirstColor = TheColor: ForeColorSample. BackColor = TheColor Else SecondColor = TheColor: BackColorSample. BackColor = TheColor
Line2. BorderColor = FirstColor
BoxOptionSample. BorderColor = FirstColor
If BoxOptionInterior(0).Value = True Then BoxOptionSample. BackColor = FirstColor
If BoxOptionInterior(1).Value = True Then BoxOptionSample. BackColor = SecondColor
GradationChanged = True
End Sub
Function TakeRGB (Colors As Long, Index As Integer) As Long
IndexColor = Colors
Red = IndexColor – Int (IndexColor / 256) * 256: IndexColor = (IndexColor – Red) / 256
Green = IndexColor – Int (IndexColor / 256) * 256: IndexColor = (IndexColor – Green) / 256
Blue = IndexColor
If Index = 0 Then TakeRGB = Red
If Index = 1 Then TakeRGB = Green
If Index = 2 Then TakeRGB = Blue
End Function
Private Sub SubMenuBlur_Click()
f = 97: f2 = f / 2 – 1
All = (MainPic. ScaleWidth – f) * (MainPic. ScaleHeight – f) / f / f
For i = f2 To MainPic. ScaleWidth – f2 Step f
For j = f2 To MainPic. ScaleHeight – f2 Step f
r = 0: g = 0: b = 0
For k = – f2 To f2 Step f2 / 2: For l = – f2 To f2 Step f2 / 2
r = r + TakeRGB (MainPic. Point (i + k, j + l), 0)
g = g + TakeRGB (MainPic. Point (i + k, j + l), 1)
b = b + TakeRGB (MainPic. Point (i + k, j + l), 2)
Next l, k
MainPic. Line (i – f2, j – f2) – (i + f2, j + f2), RGB (r / 25, g / 25, b / 25), BF
h = h + 1
If h > All Then ProgressBar1. Value = 100 Else ProgressBar1. Value = h / All * 100
Next j
Next i
MsgBox «done!!!»
ProgressBar1. Value = 0
End Sub
Private Sub SubMenuExit_Click()
End
End Sub
Private Sub SubMenuNew_Click()
MainPic. Cls
End Sub
Private Sub SubMenuOpen_Click()
On Error GoTo 10
CommonDialog1. ShowOpen
MainPic. Picture = LoadPicture (CommonDialog1. FileName)
10
End Sub
'Private Sub SubMenuSharpen_Click()
'All = (MainPic. ScaleWidth – 2) * (MainPic. ScaleHeight – 2)
'For i = 1 To MainPic. ScaleWidth – 2
'For j = 1 To MainPic. ScaleHeight – 2
'r = TakeRGB (MainPic. Point (i, j), 0) + 0.5 * (TakeRGB (MainPic. Point (i, j), 0) – TakeRGB (MainPic. Point (i – 1, j – 1), 0))
'g = TakeRGB (MainPic. Point (i, j), 1) + 0.5 * (TakeRGB (MainPic. Point (i, j), 1) – TakeRGB (MainPic. Point (i – 1, j – 1), 1))
'b = TakeRGB (MainPic. Point (i, j), 2) + 0.5 * (TakeRGB (MainPic. Point (i, j), 2) – TakeRGB (MainPic. Point (i – 1, j – 1), 2))
'If r > 255 Then r = 255 Else If r < 0 Then r = 0
'If g > 255 Then g = 255 Else If g < 0 Then g = 0
'If b > 255 Then b = 255 Else If b < 0 Then b = 0
'h = h + 1
'ProgressBar1. Value = h / All * 100
'MainPic.PSet (i, j), RGB (r, g, b)
'Next j, i
'MsgBox «done!»
'End Sub
Private Sub Text1_Change()
End Sub
Private Sub Timer1_Timer()
If GradationChanged = False Then Exit Sub
Dim sc1 As Long
Dim sc2 As Long
sc1 = FirstColor
If GradationColor(0).Value = True Then sc2 = SecondColor
If GradationColor(1).Value = True Then sc2 = &HFFFFFF
If GradationColor(2).Value = True Then sc2 = &H0
f1 = TakeRGB (sc2, 0): f2 = TakeRGB (sc2, 1): f3 = TakeRGB (sc2, 2)
v1 = TakeRGB (sc1, 0): v2 = TakeRGB (sc1, 1): v3 = TakeRGB (sc1, 2)
ForStart = 0: forstep = 10
Endpro = IIf (GradationDirection(0).Value = True, Picture1. ScaleWidth, Picture1. ScaleHeight)
For i = ForStart To Endpro Step forstep
D1 = v1 + (f1 – v1) / Endpro * i
D2 = v2 + (f2 – v2) / Endpro * i
D3 = v3 + (f3 – v3) / Endpro * i
If GradationDirection(0).Value = True Then Picture1. Line (i, 0) – (i, Picture1. ScaleHeight), RGB (D1, D2, D3)
If GradationDirection(1).Value = True Then Picture1. Line (0, i) – (Picture1. ScaleWidth, i), RGB (D1, D2, D3)
10 Next i
GradationChanged = False
End Sub
Private Sub Toolbar1_ButtonClick (ByVal Button As ComctlLib. Button)
For i = 1 To 8
If Toolbar1. Buttons(i).Value = tbrPressed Then CurrentChoice = i
Next i
Shape1. Visible = False
Line1. Visible = False
For i = 0 To 4
Optionframe(i).Visible = False
Next i
Select Case CurrentChoice
Case 1 To 2
Optionframe(0).Visible = True
Case 3
Optionframe(2).Visible = True
Case 4
Optionframe(1).Visible = True
Case 5 To 7
Optionframe(3).Visible = True
Case 8
GradationChanged = True
Optionframe(4).Visible = True
End Select
End Sub
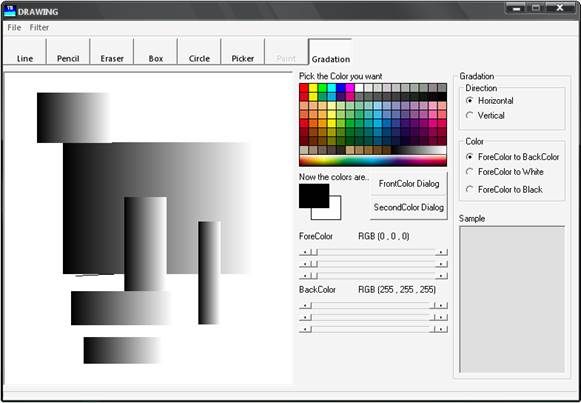
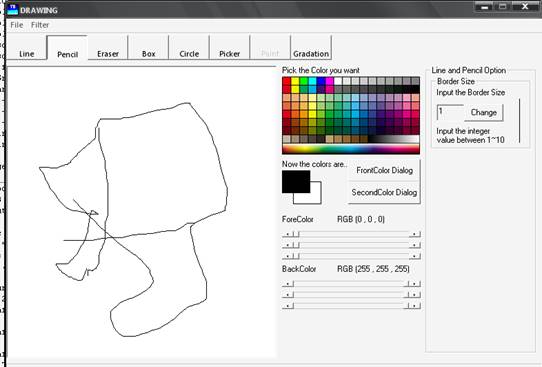
Some Graphic Actions with Graphic Editor
Похожие работы
-
Визуальное программирование
Визуализация - это процесс графического отображения сложных процессов (в данном случае построения) на экране компьютера в виде графических примитивов (графических фигур).
-
Что такое DirectX?
DirectX представляет собой набор технологий и инструментов, которые позволяют создавать разработчику игры и мультимедиа приложения с неслыханным во времена MS-DOS качеством графики и звука.
-
Что такое API ?
API - это сокращение от Application Programming Interface. В общем каждая программа, операционная система и т.д. имеет свой API. Windows - API состоит из целого ряда функций, которые позволяют Вам использовать системные Windows-конструкции.
-
Visual Basic и Системный Реестр Windows
Системный Реестр (Registry) Windows это база данных для хранения системной и пользовательской информации в Windows. Системный Реестр состоит из двух файлов.
-
Computer viruses
An example of boot record virus (Natas), written in a low-level computer language (Assembler) A fragment of infected boot record A fragment of boot record cured by DoctorWeb
-
Организация функции ПОИСК в Tmemo
Представленный ниже код я использовал при написании текстового редактора. Всё вроде работает. Итак, на форме должны быть TMemo (Editor), TFindDialog (FindDialog) и TButton (Button).
-
Работа с графическим пакетом Corel Draw и создание тестовой программы в среде Visual Basic
Система программирования - Visual Basic. Новые возможности. Быстрый запуск проекта. Средства управления. Что позволяет Visual Basic. Краткое описание работы. Corel Draw. Отличие векторной графики от растровой. Краткое описание работы в Corel Draw.
-
Создание 3D-графики средствами языка программирования Visual Basic
Структура и назначение программного кода программы по созданию 3D-графики средствами языка программирования Visual Basic. Элементы управления "Окно формы" и "Таймер", выполняемые ими функции и основные свойства, значение в работе программного кода.
-
Разработка программы в системе Microsoft Office Access на языке MVB
Программа перенесения данных из таблицы Word в таблицу базы данных. Алгоритм решения задачи в виде текстового описания. Описание базы данных (структура таблиц, схема). Копии с экрана форм для работы с базой данных при разработке их в конструкторе.
-
Greating 3D-Graphics on visual basic
Program automatic system on visual basic for graiting 3D-Graphics. Text of source code for program functions. Setting the angle and draw the rotation. There are functions for choose the color, finds the normal of each plane, draw lines and other.